

Three years ago in 2020, Elizabeth Schowachert sent me some of her hand made brushes and tools to use with oil and cold wax medium. The result was a blog post I wrote for her which has helped countless artists to see how her tools are perfect for painting with oil and cold wax medium.
More recently Elizabeth had been following my posts on social media about my online Monotype Materials & Methods course and wanted to see how her tools would perform with gel plate printing. I was thrilled when she got in touch and asked if I would review a selection of her tools. Since our original collaboration my video skills have improved so you will be pleased to know that, as well as this blog, there is a video.
Elizabeth is known for creating fabulous tools for artists. Her brushes and tools can be use with a wide range of media. I was particularly interested in seeing how the silicone blade tools work with gel plate and acrylic paint. Although suitable for any wet media Elizabeth uses them to create these spectacular monotypes.


To create an encaustic monotype, coloured wax is heated on a hot plate, spread out and manipulated before paper is laid down to collect the wax from the. In many ways the process for gel plate printmaking is similar. Acrylic paint is rolled onto a gel plate with a brayer and worked into with tools that essentially move and lift the paint. What is left on the plate is transferred to paper. The differences between the two techniques are in essence the media rather than the process, so Elizabeth’s monotype tools offer a wealth of creative possibilities to gel plate printmakers!
It is impossible to not be excited when opening a parcel from Elizabeth. These are pieces of art in their own right, made with skill, care and attention to detail. As before, a flurry of questions immediately came to mind; would they stand up to my way of working? Could I allow myself to use such beautiful things? What could they offer me that my other tools, my own included could not? The only way to find out was to use them and see for myself.
Elizabeth sent me seven tools: one 2” coarse brush and six silicone blades all beautifully made with attention to detail ranging in sizes from 3” to 12”. The first thing that struck me was the way the blades fit in my hand. I have a few silicone tools designed for ceramics, but they are flat tools only 3” long. These were very different, and I knew would be very different to use. The beautiful handles alone convey solidity and confidence. I knew straight away that the scale would encourage strong wide actions, resulting in bold expressive mark making. Just holding them gave me a flood of ideas of how I might use them. (You can find links to all the tools used at the bottom of this blog post).

You can use any paint or ink with these tools. For my initial explorations I used Carbon Black GOLDEN OPEN as it gave me time to use the tools, photograph and film it. But I could have used any paint and any colour. Initially I wanted to see how they would perform with black acrylic paint, that way I could see the patterns I could achieve. I used thin tissue paper as I knew I wanted to use these papers as graphic elements on my collages.


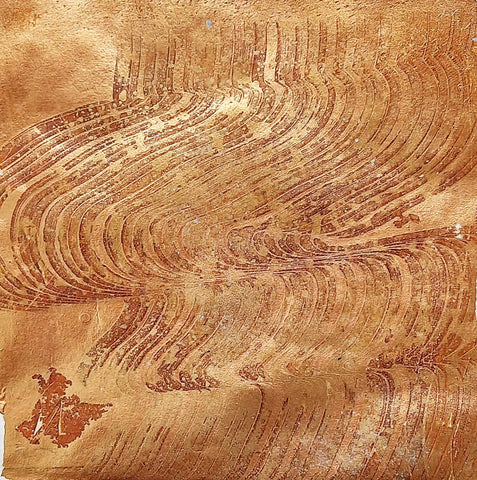
As the video above shows, I went through all the blades and the brush creating exciting patterns with each. I have used a few similar tools in the past. You can buy silicon tools for making marks in pottery glazes but there are only 8cm long. Princeton make a range of notched wedge shape tools which work well but they are very rigid. What I liked about Elizabeth’s tools was the element of flexibility within the blade that enables a wider range of marks. Some of the blades gave a more regular pattern than others due to the length of the blade. The Silicone Flex tool has flexible ‘brushes’ which gives you an element of random control as it sweeps across the plate.


The scale of the blade influences your hand movement. The larger blade encourages a wipe sweep, the smaller blade encourages a more calligraphic approach moving the blade up and down as one would when writing. But these were my initial responses, the smaller one could easily be used on a larger plate with a wider movement and repeated across the plate. The large one on a small plate leads to strong dynamic lines.


I quickly realized that although Elizabeth has created a pattern in the silicone any pattern can be manipulated and changed by the force I apply, the angle I hold it and the rotation of my hand. Just one blade could result in endless varieties of mark. It was what I did with them that would give the variety. In these two prints I varied the way I moved the blade. On the left it was a regular pull down, on the right I rocked the plate back and forth as I moved it down.

Different types of acrylic that will give different effects. The two main differences are viscosity: how thick or thin they are and whether or not they are slow drying. A thin paint will behave more like an ink, the paint will flow and move differently to if you use a thick paint, think of the difference between oil and butter. Then there are drying times. With a standard tube or fluid paint you need to work fast or your paint will dry on the plate before it hits the paper. A slow drying paint will allow you to adjust your marks, wipe areas away and or roll them out if you want to change them before laying your paper down. The wiping away I used on many of the coloured prints, building two or more layers of colour with each tool. By wiping away or masking off areas I was able to conceal and reveal, to manipulate with my own shapes and designs.

It is possible to build layers of paint letting each dry on the plate in turn before finally ‘peeling’ them off onto paper with a layer of gloss medium. That is how I made this Art Deco pattern….

I have recently bought a large 16 x 20 gel plate and naturally wanted to try the large 12” blade on it. I used Golden bronze and build the plate in layers, combining the blade marks with sweeps of the 2” coarse brush resulting in the print on the left. But you do not need a large plate. The middle print was from a 6” plate using copper paint. On the right hand image I used Golden Bronze, the first printed bronze, the second ‘ghost’ print picked up the phthalo green that was left.


We included the 2” coarse brush as I wanted to see how it would perform on the plate. I rarely use brushes, even with painting to apply paint, but I do love the sweep of a brushstroke. I still use the brush Elizabeth sent me in 2020 with my cold wax painting. But the general rule is once you have used a brush for oils you shouldn’t use it for acrylic. This brush, whilst coarse, is soft and gentle on my plate. I used it on its own but also in combination with the blades, it softens the patterns and provides contrast.

The bamboo handles have a smooth surface and wipe clean easily. The brush did hold onto some residual paint, but I didn’t let it fully dry. If you do find paint on a brush has dried then dipping it in hot water, wiping and repeating will remove any residual paint. Within minutes they were all as good as new!
I can see myself using these tools for many, many years, not just with my gel plate to create collage papers, but with my oil and cold wax painting, encaustic collagraphy and mark making. These are versatile tools made with love and care by an artist for an artist. This passing on of creativity is meaningful. It feels when I’m working that Elizabeth is with me and that brings a smile to my face. These tools are made to last a lifetime, to be used and treasured and they will be.
LINKS
Learn More about Sally https://sallyhirst.co.uk/
Youtube https://www.youtube.com/@sallyhirstartisttutor6324
Instagram: @elizabethschowachertart
YouTube: youtube.com/@elizabethschowachert
Facebook: @ESSSTUDIOS1
TOOLS
- 3 “ Silicone Micro-Line Blades (2″ – 12″) – Elizabeth Schowachert Art
- 4” Flex Silicone Blade – Elizabeth Schowachert Art
- 6" Silicone Blade Multi-Line 3 (2″ – 12″) – Elizabeth Schowachert Art
- 6” Silicone Blade Multi-Line (2″ – 12″) – Elizabeth Schowachert Art
- 8” Silicone Blade Multi-Line Chunky (4″ – 12″) – Elizabeth Schowachert Art
- 12” Silicone Blade Multi-Line 3 (2″ – 12″) – Elizabeth Schowachert Art
- 2″ Coarse Brush


